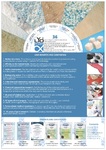
+7 (929) 727 53 60 Traumatology / Orthopedics / Neurosurgery
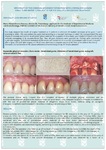
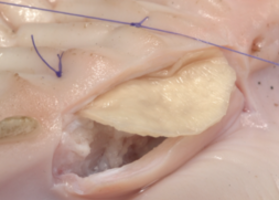
Instructions: Preparing the receiving bed when / before the complex DTR
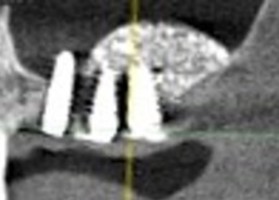
The bone tissue on the outside is represented by the endplate of the cortical bone. Assessment of the ratio of compact bone and spongy conducts radiographically by sagittal sections of a computerized topographic study. If the compact bone thickness is 1 mm, we will not remove part of the cortical layer. If 2 or more mm: partial decorticization of the receiving bed is performed. The goal is to thin the volume of the compact bone and damage the cells of the compact bone. If you do not, then the perforations, which we will further drill during the preparation of the bed, will quickly tighten and a blood vessel will form on it, which will feed the entire volume of the newly formed bone. This will cause uncontrolled loss of bone height in remote periods after surgery. Decorticalization is performed with a coarse-grain carbide cutter. For most situations, 2-3 rounds on the surface of the future contact with the bone bioimplant are sufficient.
After that, longitudinal transverse scarification of the deeper layer of compact bone is performed. The task is to damage the compact bone cells that lie in the deep layers of the cortical plate. These are live, full-fledged cells. When they die, they release decay products into the microcerculator bed. Nutrition deep layer of compact bone comes from the receiving bed. Therefore, cellular and humoral reactions from the side of the receiving bed will also be activated and occur with great effect.
Then a drill with a diameter of 0.8 to 1.2 mm, punctures are performed at a distance of 5 mm from each other. After the dispenser, the water supply stops and at low revolutions - 100 revolutions per minute, the cells of the spongy bone are assembled with a drill, sinking the drill into 5-6 mm. With such manipulations, it is normal for a patient to have a bone volume that increases by 1–1.5 mm without bone grafting. It can be used as an additional manipulation in case of thickening of the gum biotype in front of the bone grafting or plastic grafting of individual bone blocks to assess the patient's regenerative potential.
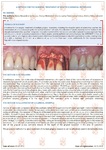
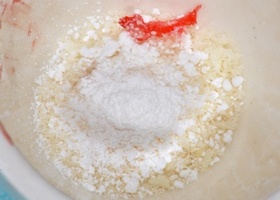
The concept of Mix-MAX. How to mix material before installation?
Our task is to grow the volume of new tissue from vascularized bone bioimplant, the vascular network of which will feed the volume of the newly formed bone in the future.
We collect capillary blood from the first cut into one or two Petri dishes. Add a saline solution in equal proportions to reduce blood clotting. Then, spongy autochial cells, additional and basic components from the smallest in dispersion and content in the total volume of the bone implant are added to the mixture. Depending on the clinical situation, this will be demineralized powder of compact bone or mineral component of bone tissue, and then demineralized powder of compact bone. Mixing is carried out before the formation of a homogeneous plastic mass of even color. At the end, we add the rest of the liquid and the base material to the required volume of the bone bioimplant. As a result, we must obtain a uniform fraction of the implant capable of holding the shape. If you have a centrifuge, it is always recommended to use it.
From the moment the cells are collected until the bone implant is installed, it should be no more than 20 minutes. If the mixture is prepared for individual implants, then in 2 Petri dishes, mixes of additional components are prepared independently. Mixing always begins with living cells, since our task is to distribute them as evenly as possible in the volume of the bone implant. Excess moisture is removed with a gauze triangle. The mixture with cells of the autocytic is applied to the block in a volume of 10% from the upper surface on the side of the mucoperiosteal flap. The mixture without cells - on the lower surface from the side of the receiving bed in the amount of 10%.
-
Instructions: The need to close lateral access during sinus lift
 The risk of migration / loss of the bone bioimplant from the sinus and the contact of the split flap with the bone bioimplant require that the sinus window be closed with a membrane or bone plate.
Read more
The risk of migration / loss of the bone bioimplant from the sinus and the contact of the split flap with the bone bioimplant require that the sinus window be closed with a membrane or bone plate.
Read more
-
Instructions: Increase the volume of the attached gingiva with a Collagen membrane (dura mater)
 The purpose of the operation: the creation of the volume and thickness of the attached gingiva in the area of future bone grafting, an increase in the vestibule of the oral cavity, the launch of the patient's own regenerative potentials.
Read more
The purpose of the operation: the creation of the volume and thickness of the attached gingiva in the area of future bone grafting, an increase in the vestibule of the oral cavity, the launch of the patient's own regenerative potentials.
Read more
-
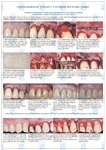
Instructions: Preservation of the hole after tooth extraction. Additional manipulation
 The purpose of manipulation: the release of reticulo-fibrous cells (Pritchard) from under the compact plate of the alveoli into the cavity to start regenerative processes in the blood clot and osteogenesis.
Read more
The purpose of manipulation: the release of reticulo-fibrous cells (Pritchard) from under the compact plate of the alveoli into the cavity to start regenerative processes in the blood clot and osteogenesis.
Read more
-
Instructions: Interval of delayed implantation after sinus lift
 The waiting time depends on the baseline, volume and quality of the patient's bone in the sinuses, the condition of the soft tissues, the age of the patient, associated diseases and other factors.
Read more
The waiting time depends on the baseline, volume and quality of the patient's bone in the sinuses, the condition of the soft tissues, the age of the patient, associated diseases and other factors.
Read more